This page contains various tips and tricks that can be useful in the world of S.T.A.L.K.E.R.: Shadow of Chernobyl.
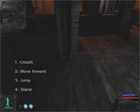
Although I'm sure most of you have figured this out by now, I thought I would include a small tip, referred to as a crouch-jump, that allows you to jump slightly higher than a regular jump. Although the crouch-jump isn't getting you alot higher, it does allow you to get onto some obstacles that a normal jump can't.There are four steps involved in a crouch-jump:1: Crouch (duh!)
2: Move towards the object you wish to jump onto (this step can sometimes be omitted)
3: Perform a regular jump (while crouched), and...
4: Quickly stand up while still in the air.The Bar is a good place to practise since the tables there are too tall for a regular jump, but not a crouch-jump, and you can practise as many times as you'd like without having to worry about getting interrupted. |
| I reckon this is a tip that can be used for other weapons than just the Storming Obokan but in this clip it's the weapon I'm going for. After having retrieved the weapon and given it to Brome as part of the Find the weapon of the Dutyer mission you can actually get it back. First you need to wait until Brome has the weapon on his back. What you need to do now is simply drop a weapon near Brome - if he likes it, and the weapon is close enough, he'll pick it up and drop the Storming Obokan. However, I think they need to find the weapon you drop better than the one they already have. In the video you'll notice that I tried with a IL 86 and Brome was perfectly happy with that. I have tried the trick with General Voronin but unfortunately he didn't bite; some of his guards, carrying Tunder S14, were quite happy to drop their rifles, though. A big thanks to Paul Jay for this excellent tip! Update: I used this trick to get the Storming Obokan back. When I later returned to the Bar, Brome actually gave out the same mission again. Since I now had the unique Obokan in my stash, I could easily retrieve it and give it to him; he was still carrying the IL 86 that I gave to him, and when I provided him with the Storming Obokan he immediately dropped the IL 86 - however, right after that he decided that the IL 86 still was a superior weapon and picked it up, once again dropping the Storming Obokan. Apparently he cannot make up his mind. It seems like this mission is one you can do over and over - I am just not certain when exactly he'll give out the mission after the first time. Perhaps right after, but I haven't verified this yet. |
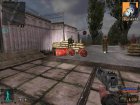
| Ever wondered how you could gain entrance to the Freedom armory without killing anybody? Sure, you can wait for the guard to leave if and when the Duty members attack... you can also try and roll some barrels up the stairs and use the trick below to kill the guard without actually becoming enemies with Freedom. Finally you can just say "to hell with it" and kill the guard. However, there is a much, much simpler way - well, sort of. What you need to do is find a chair inside the room opposite of Skinflint. You need to nudge that chair close to the armory guard - which can be a bit tricky and slightly frustrating, but in the end it's not too hard. Once the chair is close enough, jump onto it and then on top of the guard; I believe you have to be crouching to be able to make it. Once you're past the guard you can freely loot the armory - and fortunately there is another chair behind the guard as well, so you can use that to make your way out using the same approach. Obviously, since you may get stuck at any point during this trick, I strongly recommend that you create a new manual savegame before attempting this. Many thanks to Julio Vega for helping me confirm that this trick is in fact possible. |
| Ever been in so much need of a drink you just have to get to the bar, no matter what the cost is? Well, in this video our resident stalker, Rhialto, demonstrates how to get to the Bar area without having to follow the storyline. The solution may be controversial but it gets the job done! Refer to the video for more information. Kudos to Rhialto for the video and the tip! Update: Just found out that you don't have to use a grenade - at least I didn't. Just shooting the guards made the gate pop open... but we all know that using a grenade is alot more fun  . And, of course, shooting the guards is not appreciated by any of the Duty members around the outpost so expect a "negative" reaction from them. . And, of course, shooting the guards is not appreciated by any of the Duty members around the outpost so expect a "negative" reaction from them. |
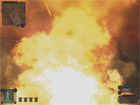
| This video shows you how to deal with the Destroy the stalker from Freedom mission given by Colonel Petrenko, without making a dent in your reputation with the Freedom faction. All you basically need to do is use the good old "I didn't do it" trick - in this case, shoot some barrels to make them explode and have them kill the target. Hey, it's not your fault those Freedom goons didn't move, right? The tip is generic so you can use this for other tricky missions like this - if you can find those red, exploding barrels that is. A big thank you to Rhialto for both the video and the superb tip! |
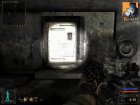
| This video shows you how to open the "final" door (inside the Sarcophagus) without using the decoder. All you need to do is get really close to the door and then drop your weapon - I reckon the physics engine detects the collision between the weapon and the door thus forcing the door open... or something along those lines. In any case, it's a very nice tip especially for those who forgot to meet with Guide and the Doctor, or just possibly didn't bother visiting the stash in Pripyat. A big thank you to Rhialto for another excellent video! |
| This video demonstrates how you can not only heal yourself but also repair your armor by using artifacts and hazards. In this specific example I am using Battery artifacts (protection against burn) and a fire barrel. The trick is that if you wear artifacts that in total provide more than 100% in protection, you will actually heal wounds and get your armor repaired if you walk into the hazard that the artifacts protect you against. As you can see in the video, I need to use four artifacts that accumulate to a 120% protection against burn; the hazard is the fire barrel, but the Burner anomaly would also have worked just fine. Please notice that it does take a while for the armor to repair - the higher protection against the hazard the armor has, the slower the repair process will be. This tip also works with other artifacts and anomalies: |
|


 - @dawnrazor73