| Walkthrough - The Sarcophagus | Last modified: 15/7/2010 20:28:03 CET |
| Table of content |
 Top floor Top floor |
 Monolith control Monolith control |
 The story explained The story explained |
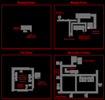
 Map of the Sarcophagus |

Move out of the initial room and head east - soon you'll notice a passage leading further south; beware, it has a Gauss sniper at the end of it - he can be hard to see, even if you have nightvision - if he doesn't spot you, you can always get out your binoculars and pinpoint his exact position with that. Deal with him and move south.
Move into the next hallway proceed north and then east - soon you'll come to an opening to the north - careful, beyond there is a room which has numerous solders in it. Deal with most of them, but before you proceed that way, move further east; there may be two solderis ahead so proceed with caution. Moving south you'll see another room - the area ahead is very radioactive so watch for the icon and use antirads and medkits (or bandages) as appropriate. Just inside the door, to the south, you'll notice a ladder going down - it'll take you to the bottom floor. Head down and find the stash box and a wooden crate. Search the stash to find some antirads, ammunition, bandages, medkits and the Exoskeleton armor. Break the box to find some good artifacts. Move up again; there is another box here containing some ammunition. Once you got what you need, head back into the hallway.
Move back to the path going north and slowly head into the room - you may have dealt with the majority there, but there is likely still a couple of soldiers remaining. One of the soldiers here is carrying the FT 200M - a solid assault rifle with an excellent firing rate and an integrated grenade launcher. If you still carry the GP 37 or a similar rifle you may consider replacing it; as already mentioned I usually stick to the Vintar. Also, whether you like the FT is pretty much up to personal preference. Move west, into the hallway and follow that south until you come to a room with stairs going up. There are soldiers about so proceed with caution.
| Top floor | Back to top |
 |
The "secret door" is located on the nothern side of the floor - you'll find the entrance and a ladder near the rotating light. Once you've climbed the ladder you'll be prompted to open the door using the decoder. Just inside the room near the ladder you'll find another Exoskeleton armor - so you might as well replace your old one, even if it's only slighty damaged - you're not likely to come back here once you move beyond the door. Near the door you can find a metal box containing some goodies. Approach the door and "use" it - a timer will start indicating that the decoding will take 30 seconds; not a huge problem except that soldiers will be teleported into the room you're in - it should be fairly easy for you to use the cover near the door and keep the soldiers at bay until the door finally opens - when it does, proceed through it onto the level transition.
| Monolith control | Back to top |
Proceed forward and you'll soon spot an opening to the south, going into a long hallway - expect alot of soldiers around so be sure to stay in cover and lean out to have a look and possibly take shots at any enemies in sight. To the west there's likely to be a Gauss sniper behind a grate/fence so be sure to deal with him before you start making your way into the hallway. Move east and then south. You'll come across a few rooms on the way and some of them may have a soldier in it - so be sure to check them out before proceeding; also be sure to break any crates you come upon - some of them have various goodies in them. When you reach the end of the hallway going south lean out and check ahead of you - there may be a collection of soldiers further down to the west, including another Gauss sniper.
If you look into the control room you'll notice a number of blue orbs - and above them a hologram resembling the monolith. You need to shut down the monolith so start shooting the blue orbs - they will take a few shots to destroy. Once you've destroyed them all the level will end.
Your final choice is whether or not you wish to join the C-Consciousness project. If you decide to join them, you'll be treated to a cutscene and the game will end. If you refuse, however, you still got some fighting to do before the show is over. Go to the next page in this case. If you are interested in scrutinizing what C-Consciousness tells you, you can find a transcription of the conversation here. |
| The story explained | Back to top |
They used the Chernobyl plant, and the areas and installations around it, not only because it was left pretty much deserted in the years following the accident in 1986, but also because many of the installations had large antennas that were vital for the experiment, and the installations themselves could be expanded to function as labs and construction sites for parts needed in the project.
The creation of the Zone had major a drawback, namely that it began to attract attention from the outside world. People would start to come to the Zone - some looking for artifacts, others simply to try and work out what the Zone really was and why it came to be. With the extra attention on the Chernobyl area, C-Consciousness constructed a number of psi-emitters with the purpose of keeping outsiders away; they could use them either to "fry" the brains of anyone who came too close, turning them into mindless zombies, or they could use the psi-emitters to take control of their minds - the latter individuals were given the S.T.A.L.K.E.R. tattoo to identify them as special agents now working for C-Consciousness. But the psi-emitters alone were not enough. The Monolith (aka. the Wish Granter) inside Chernobyl was created as a lure for anyone who would come too close to the actual location of the C-Consciousness; it would pose as something that could fulfill any wish - but in reality, it would simply dispose of anyone approaching it. To provide even more flexible security, the C-Consciousness also used the psi-emitters to essentially create the Monolith faction - a group of mind-controlled stalkers with the single purpose of protecting the secret behind it all, but also to put focus on (and support) the myth about the wish-granting Monolith. Two birds with one stone.
Shortly prior to the start of the game, Strelok and his group had in fact made it past the Brain Scorcher and into the center of the Zone. They made it all the way to the Monolith inside Chernobyl where they also found a locked door and information revealing that the Monolith was nothing more than a trap. With this information in hand, and a locked door before them, Strelok and his group had no other option than to retreat and work out a way to open the door. Fang managed to construct a decoder that would be able to open the door, but Strelok never got that far.
By this time, Strelok and his group had caught the attention of C-Consciousness who started to recruit agents with the single purpose of killing him - Strelok was too close to finding out the truth. During one of his lone trips into the center of the Zone, Strelok was caught in a blowout and was rendered unconscious. Not knowing that this was in fact Strelok, C-Consciousness decided to "recruit" him and gave him the mission of finding and killing himself.
Streloks group had in the meantime begun to find other work. Fang died in a bandit ambush, and Ghost tried to help the scientists in Yantar to learn more about the psi-emitters but met his end inside X16.
However, during one of the "death truck" transportations the truck carrying Strelok was hit by lightning and crashed; Strelok survived, and was taken to the outskirts of the Zone - out of reach of the psi-emitters where he would regain control of himself, albeit with a severe case of amnesia. Your only clue at this point was the message on your PDA: "Kill the Strelok".


 - @dawnrazor73