|
This page contains various tips and information regarding gameplay and game mechanics of S.T.A.L.K.E.R.: Shadow of Chernobyl.
Anomalies are stationary hazards created by the Zone. They come in different shapes and forms and they all form artifacts. You can find a complete list of all the different anomalies here.
Artifacts are special items formed by anomalies. They come with different positive and negative properties that can aid you in different ways. You have to "wear" artifacts for them to have an effect - to wear an artifact either double-click it in your inventory or drag and drop it onto the active artifact slots in the upper-right corner of your inventory. You can wear up to 5 artifacts at the same time. Visit this page to see a list of the available artifacts.
Depending on how much weight you carry, running (and sprinting especially) will drain your endurance. When your endurance is almost out, you can't run nor sprint anymore and you'll have to stop and catch your breath. The more you carry the faster your endurance will decrease, especially if you exceed the regular 50 kilo mark - in this case the weight indicator of your inventory will be displayed in red, and sprinting at this point will drain your endurance alot faster. You can find certain artifacts (Flash, Moonlight and Sparkler) that will help you recover endurance faster - and if you have enough of them, you'll be able to sprint for as long as you'd like. Also, quaffing energy drinks will completely replenish your endurance. You can increase your carrying capacity by wearing certain types or armor such as the Tourist Suit and the Exoskeleton.
Most of the weapons you come across - especially assault rifles and sniper rifles - will have different firing modes available. The firing mode is indicated in the lower right corner of the screen, next to the ammo type - (A) indicates full auto, (3) and (2) indicates semi-automatic (burst), and (1) indicates single shot mode. I personally tend to use full auto and single shot the most; full auto can be handy in alot of situations where close combat is the most obvious one - in these situations you wont have to aim precisely, and you'll want to be able to deliver as many shots as fast as possible. Single shot mode is useful for precise aiming (ie. with the iron sight or a scope) since the recoil of a single shot won't ruin your aim.
I personally don't use the iron sight that often, only when I am trying to hit a target far away. Up close you'll basically get the same accuracy by just shooting "from the hip". Scopes are a different story since they provide a much better accuracy when used. S.T.A.L.K.E.R.: Shadow of Chernobyl has a somewhat realistic damage simulation - in other words, headshots are much more effective than shots to the body or limbs.
Over time you'll grow hungry and in this case a small knife and fork icon will appear on the lower right side of the screen. Initially the icon will be green to indicate slight hunger, but eventually it'll turn darker and darker to indicate growing hunger and once you've starved for too long you'll start to lose health. Fortunately food is pretty abundant and you'll be able to buy it from vendors and other stalkers, and you can usually find alot of food on corpses. There are three basic types of food: bread, diet sausage and canned food. They each satisfy different amounts of hunger, ie. canned food is the best but also weighs the most. Eating food will also restore small amounts of your health.
The differences between difficulty seems to be split up into three areas: how much damage enemies need to take before they go down and how much damage you take from enemy fire, anomalies, etc. I am not sure if armor degrade slower on lower difficulty, or if this is simply an effect of you taking less damage in general.
The Zone has alot of dangers in it that will cause you to lose health - anomalies, radiation, and of course being shot are the most obvious ones. When you are hurt you may also begin to bleed - this is indicated by a small "drop" icon on the right side of your screen; the color of the icon will indicate the severity of the bleeding, light green indicates small amounts of bleeding while a red icon indicates heavy bleeding. Bleeding will cause you to, depending on the severity, lose more health over time. Bleeding can be stopped by using bandages or by wearing artifacts that mends bleeding. Health can be restored by using bandages but medkits and first aid kits are the most effective; you can also eat food to replenish small amounts of health, and certain artifacts will increase your natural health regeneration.
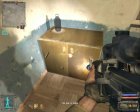
During the course of the game you'll often come across different cabinets, lockers, desks and other objects that may have doors in them. These will sometimes be locked, and the majority of them can actually be shot open - however not all of them. This is demonstrated in the video. To shoot a door open, aim for the lock and shoot until the door swings open. For those you cannot open, you can often "grab" any items through the door, which many times eliminate the need to open the door in the first place - however, there are very rare situations where you actually need to open a locked door or container to be able to get all the items inside.
You will also come across doors that are locked with a padlock. Some of these can be opened if you shoot (or stab with your knife) the padlock until it falls off.
As you'll soon find out, artifacts and mutant body parts can be quite expensive and can be sold for a good profit. However, I personally tend to keep the artifacts for as long as possible (ie. hide the ones I don't use in personal stashes). This is because, often certain people such as Sidorovich will provide optional missions that require you to find certain artifacts, and since these missions simply require you to find any artifact of a given type, you can often just pick up these missions, grab the artifact from your stash (if you have the artifact, of course) and use that to complete the mission. Doing these optional missions will not only earn you more money that you would gain from just selling the artifact, but may also give you some additional items (usually medkits and/or ammunition).
The same goes for mutant body parts - although Sidorovich personally wont buy these, you can sell body parts to other stalkers (and some vendors) for a nice price; but as explained with artifacts above, you can often pick up optional missions that require you to find a specific body part from a mutant. So if you always search the bodies of mutants and pick up any body parts that they may have, you can collect these and keep them in your stashes ready to use if an optional mission should be available.
Also note that you can cancel an optional mission if you wish to. To do this, talk to the person that you picked up the mission from (or who gave it to you) and tell him that you're there "for the job". You can then say that you refuse to do that particular job. As far as I know, doing this does not have any negative consequences and it can be useful if you're looking for a specific optional mission - usually certain contacts will only have about 4 or 5 different optional missions at a time, and if you're looking for a mission that isn't in this list you can pick up some of the optional missions, refuse to do them, and the list of missions available will have changed.
All around the Zone you'll run into pockets of radiation - areas full of radioactivity. When you're in such an area you can hear your geiger counter ticking; you'll be accumulating radiation which can be seen in the radiation indicator in your inventory, and a radioactivity icon will also appear on your screen. Also, when you're heavily radiated the screen will become brighter; for an example, check out this video. Even small amounts of radiation will mean that you'll start to lose health, increasing with the amount of radiation you've accumulated. The screen icon will be green initially to indicate low radiation but may become darker ending in red to indicate lethal radiation. You can drink vodka, use antiradiation drugs or special first aid kits to decrease or completely remove any radiation; also, certain artifacts can protect you against radiation and be used to remove radiation (although not as effectively - or fast - as antiradiation drugs).
As you can see in the list of artifacts, certain artifacts have a property that negates radiation (or provides "antiradiation"). These artifacts are useful for two things; first of all they can be used to protect you against (and remove) radiation, somewhat similar to antiradiation drugs or vodka, however they remove the radiation over time instead of instantly. Second, they can provide protection against artifacts that accumulate radiation (ie. artifacts with a positive Radiation value) - only artifacts can prevent this accumulation, so even if you have an armor with a high protection against radiation, you'll still accumulate radiation from using these artifacts.
The radiation properties of artifacts are added and subtracted to a final "value". Say, for example, that you are wearing three Stone Flower artifacts and a Droplets artifact. Each Stone Flower has a +5 Radiation property and the Droplets artifact has a -10 Radiation property. This means that the sum of wearing those artifacts is +5 (3 * 5 - 10), which means that you'll slowly be accumulating radiation by wearing them - to prevent this, you'll need to replace the Droplets with an antiradiation artifact with -20 Radiation (well, technically -15 but artifacts with this value do not exist) or wear a second antiradiation artifact. Using a single -20 Radiation artifact along with the three Stone Flower artifacts would also mean that you'd have a -5 Radiation "surplus" (the -15 is negated by the +15 from the Stone Flower artifacts) that would help you remove any radiation that you do accumulate eg. from pockets of radiation.
Although S.T.A.L.K.E.R.: Shadow of Chernobyl has quickload and quicksave functions (F7 and F6, respectively), you should be sure to make "main" (or manual) savegames often. You'll likely find yourself quicksaving during firefights which usually is a good idea, but in case you make one at a bad spot (ie. just before getting shot in the back) you'll want to have an earlier savegame to go back to. Since the quicksave will use the same save slot every time you quicksave, you'll basically be overwriting it all the time - and you won't be able to go back to an earlier quicksave. The same goes for autosaves - every time you enter a new area the game will make an autosave for you - but like quicksaves, these will also use the same slot and will eventually be overwritten. I personally tend to make at least one manual save at the beginning of a new area - and possibly a few more along the way. This way you always have a recent (or semi-recent) savegame to rely on in case something goes wrong with your quicksave.
You will come upon two different types of traders in the Zone that will buy and sell various items. The most common traders are fellow stalkers that may have a small selection of items for sale; these items usually include food, bandages and medkits however which specific items a stalker will have for sale seems to be quite random. Stalkers will also buy a limited type of items from you (such as food, artifacts and mutant body parts) but they have a finite amount of money available.
The other type of traders are dedicated traders that will not only sell and buy a larger variety of items than stalkers, but they can also provide a number of optional missions. Traders of this type will sell the same kind of items as other stalkers, but will also have ammunition, weapons and armors in their inventories. All of these traders, except for Skinflint, also have an unlimited amount of money so you can sell as much loot to them as you'd like.
For a comprehensive list of traders, inventory and prices, etc. please refer to this page.
After having ventured into the Zone you're likely to find yourself with alot of weapons and possibly an armor or two. These items, along with ammunition, food, artifacts, etc. can be sold to vendors - other stalkers will also buy certain items, except for weapons, ammunition and armor. This is a great way to earn additional money that you can spend on the equipment you really need.
When you open your inventory and click on these items, you'll notice that they have a condition indicator below the item price. This indicator is important when it comes to weapons and armors since the condition of a weapon, for example, directly affects the chance of it to become jammed when you use it - a jam will require that you reload the weapon before you can fire it again, which obviously not only can be annoying but also quite fatal in the right (or should I say wrong) situation. This means that whatever weapons you decide to sell should be the ones with the worst condition; they wont be as valuable as the ones with better condition, but that shouldn't be a problem - you'll never get rich by selling weapons alone anyway, and soon enough you'll come across more weapons than you really need or even wish to carry around. The condition of a weapon (and armor) will decrease as it's used; the condition of weapons decrease very slowly with every use (ie. each time you fire), and for armors it's dependant on how much damage you've taken from bullets, explosions, etc. As the condition of an armor decreases so does its protective features - which means that you may wish, from time to time, to replace your armor with a "fresh" (or better) version. Armors, like weapons, can be found in stashes and various places, but also be bought from vendors around the Zone.
More often than not you'll end up having too much loot - finding more items, weapons, etc. than you can actaully carry with you. You can of course simply make trips back and forth from a vendor to make sure you sell it all, but it's time consuming and weapons, for example, won't really be worth it considering the amount of money you get compared to how much a weapon weighs. Ammunition is a different story - you can carry alot of ammunition at the expense of a looted weapon, and it will often net you alot more money. Also antiradiation drugs are not only more effective than vodka bottles, but they also weigh less and are more expensive - in other words, always take preference to antiradiation drugs if you're faced with a choice between the two. The Traders, Inventory & Prices page includes a weight vs. price comparison (the RU/Kg column) for all items that you can use to determine which ones are the most lucrative to haul back to a trader.
Immediately after starting a new game and having talked to Sidorovich you should see a blue box on the floor - this is a so-called private stash, and it's there for you to use. There are two different types of stashes - private stashes (blue boxes) and secret stashes. The private stashes are basically places where you can safely store equipment, meaning that other stalkers or enemies won't touch or take items from them, and anything in these stashes will be saved when you save your current game. They are extremely handy because often you may find weapons and equipment that you wish to keep, but at the same time don't want to carry around all the time. In short, use the private stashes to store equipment. These types of stashes can be found in various key areas around the Zone.
I have seen reports that some people have had their blue box stashes wiped and replaced with random loot; this is obviously concerning, and indicates that not all blue box stashes are "safe" to use; in fact, some secret stashes (see below) appear as blue boxes which means that just because you see a blue box doesn't mean it's a safe place to store equipment. However, consider the blue box stashes in some key locations (at Sidorovich in Cordon and the 100 Rads bar in the Bar area) safe to use since they are located in "havens" - places where other stalkers either don't come or don't wander about.
Secret stashes are scattered all over the Zone but you'll need to find information about them first - this means that even if you come by a place to "put things" (such as a pipe, a safe, or whatever) it's more than likely going to be empty unless you have found information about that particular stash first. Information about secret stashes can be found by searching the bodies of dead stalkers, bandits, etc. (mutants and zombies will not reveal such information) or may sometimes be given to you as part of a mission reward. Once you have found enough information about a secret stash it will be shown on the map in your PDA with a round, purple icon; you can hover your mouse over these icons to see a description of the individual stashes. Sometimes when you empty a secret stash the icon on your map will disappear, sometimes it wont. The latter case is experienced when you have found information about the stash more than once, without looting it in the meantime. I reckon this is a bug.
It seems that a few words has been confused in S.T.A.L.K.E.R.: Shadow of Chernobyl regarding stash locations - often you may see the word "cellar" in the description of a stash where it should actually say "ceiling" or "attic", and possibly vice versa.
Make sure you search any bodies you come upon - even if you have already searched them before. If you kill some bandits, for example, you can search their bodies for goodies and information about stashes; if you move to a different area of the Zone, and later come back, searching the bodies again may reveal new information about other stashes. For a list of secret stashes, their locations and content, please refer to this page.
When you buy a weapon from a vendor (eg. Sidorovich), or receive one as part of a mission reward, it will come loaded with one clip (or rounds) of standard ammunition for that weapon. The weapons you find on bandits and other defeated enemies may have ammunition in them; you can unload it and salvage the ammo which is handy if you are low, or you want to gather ammo without carrying alot of weapons with you. To unload the ammunition from a weapon, open up your inventory, right-click the weapon and click unload in the pop-up menu; if the unload item isn't available it simply means that the weapon is empty. You can also use the same procedure to dismount weapon attachments (scopes, grenade launchers, and silencers); not all scopes, silencers and grenade launchers can be detached. To apply an attachment to a weapon, equip the weapon you wish to attach it to and either drag and drop the attachment onto the weapon or right-click the attachment and click attach.... Most attachments, with the exception of SUSAT scopes, are rare so if you come upon one be sure to keep it.
Containers such as wooden crates and metal boxes can be broken and may often reveal various items - usually ammunition, medkits, bandages, etc. and even artifacts (although I think these only can be found in crates). You can break these containers by shooting them or by using your knife. Before you pick up the items, notice that when you point the reticle near an item you can pick up, an icon of that item will appear on the screen - this is useful not only to see what the item is, but the icon will usually appear when the reticle is close to an item, and thus can be handy to find partially obscured or hidden objects. Also, try to press and hold down the Use key - you should notice that labels appear on the screen, for a short time, to indicate different nearby items; this can be useful (eg. in dark places) to locate items that may be hidden from vision.
Please note that I'll often describe specifically what you can find in various crates and boxes - however, many of these items seem to be randomly generated so don't expect to find exactly the same.
|


 - @dawnrazor73